
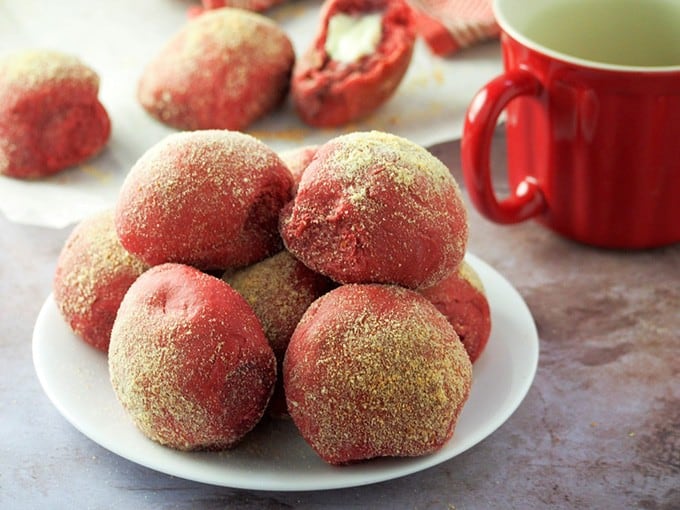
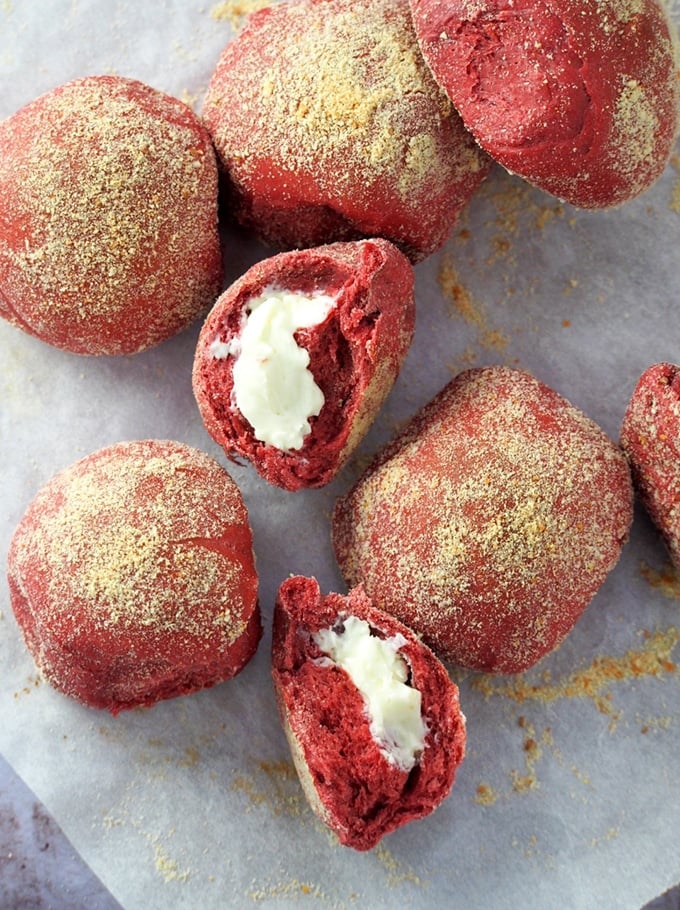
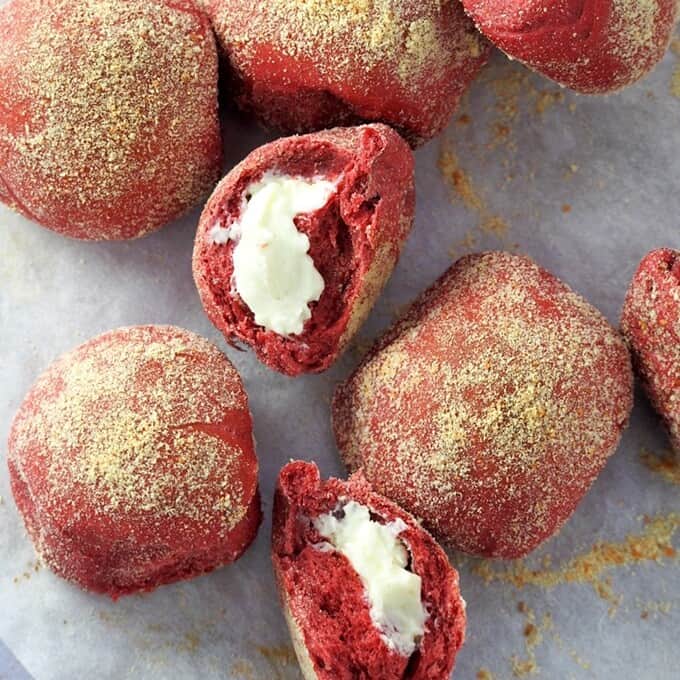
Fall in love with this glammed-up version of our favorite Filipino bread roll! Red Velvet Pandesal with a hint of chocolate flavor, a touch of sweetness from the cream cheese filling, and gorgeous color are sure to wow the crowd.
Hello everyone! I am Sanna, and I am back with a must-try baked treat.
Last week, I shared with you my take on the hottest bread trend, ube cheese pandesal, and today, I'm bringing you another variant that's inspired by red velvet cake.
Red velvet is one of my favorite cake flavors. The subtle hint of chocolate flavor, sweet cream cheese frosting, and bright-red color are pretty hard to resist.
It's no surprise that this dessert has been adapted into many forms, such as crinkles, cheesecakes, brownies, and ice cream. And now, our pandesal, too!
Step by step
This recipe is based on Kawaling Pinoy's delicious pandesal, which I modified to include cocoa powder, red food coloring, and delicious cream cheese filling. The result is a pillowy soft bun that is as pretty as it is tasty!

Step 1: make the dough
- In a large mixing bowl, sprinkle the yeast and about one teaspoon of the sugar in warm water and let sit for about 5 minutes, or until foamy. This step is to "prove" the yeast is alive and active. Make sure the water is at 105 - 115 F temperature as too hot liquids will kill the yeast.
- If using instant dry yeast, use the same amount, and add directly to the dry ingredients without proofing. Reduce the rise time by 10 to 15 minutes.
- Add the milk, the remaining sugar, eggs, softened, butter, salt, cocoa powder, and red food coloring. Stir everything well.
- Add 2 cups of flour and use a stand mixer to beat the mixture until combined. Gradually add 2 ½ cups of flour, half a cup at a time, and continue beating to combine. If the dough is still too wet, add a few tablespoons of the reserved flour just until the dough gathers into a shaggy mass.
- Can you substitute bread flour for all-purpose flour? Yes, but the results won't be exactly the same. Bread flour has a higher gluten content, resulting in a chewier texture.
Step 2: knead and proof
- To make kneading easier, grease work surface and your hands with oil and sprinkle the dough with flour, but do so sparingly as oversaturating the dough with oil will keep it from rising and adding too much flour will make it dry.
- Knead the dough until it's smooth, elastic, and has lost a lot of its stickiness. To check if the dough is well-kneaded, do the windowpane test. Take a small portion of the dough and with your fingers, stretch it out to form a square. A translucent film should form in the center without breaking easily.
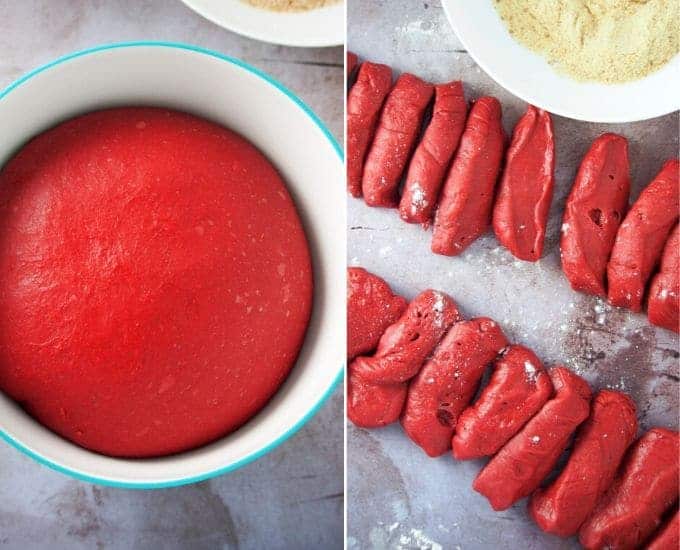
- Place the dough in a lightly oiled bowl and cover the bowl with a clean towel or plastic wrap. Place in a draft-free area and let rise for 1 ½ to 2 hours, or until doubled in size.
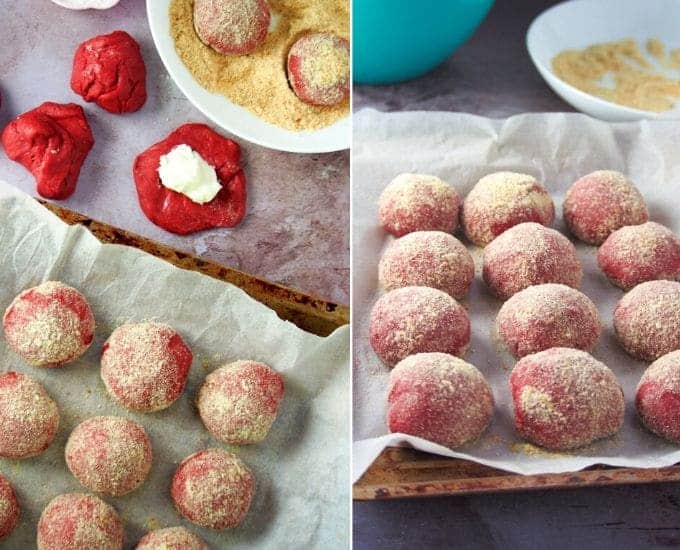
- Once risen, gently deflate the dough. On a flat surface, shape the dough into a log about 20 inches long and divide in half. Shape and elongate each half into 12 inches long and cut into 12 even portions, totaling 24 portions.
Step 3: assembly and baking
- With your palms, flatten a dough portion and spoon about ½ tablespoon of the cream cheese filling in the center of the dough.
- Fold the edges of the dough towards the center to cover the filling and shape the dough into a smooth ball. Tuck the ends under to seal.
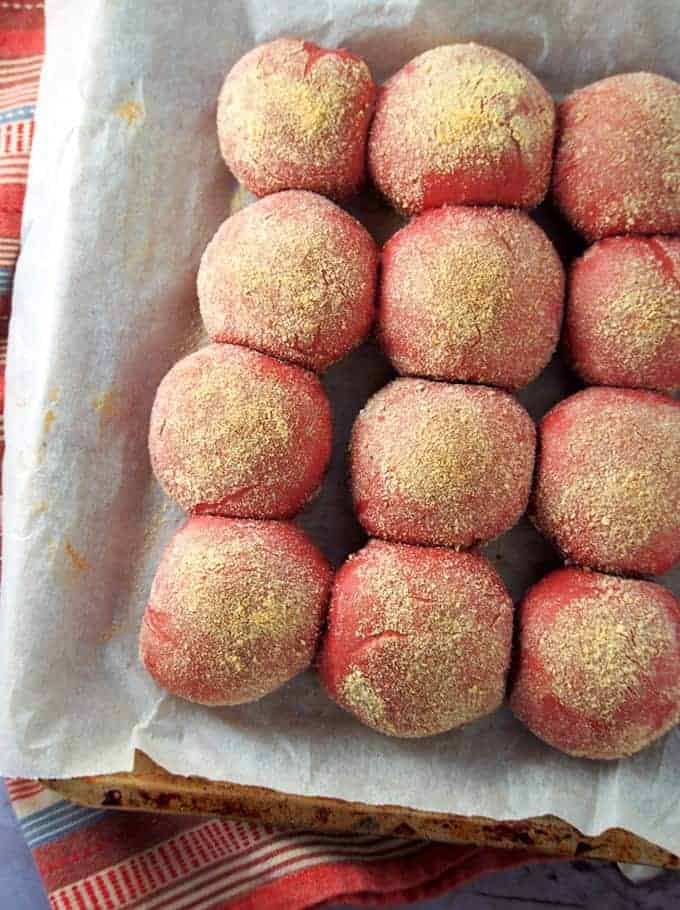
- Roll the dough balls in bread crumbs and arrange in a single layer at about 1-inch apart on a parchment-lined baking sheet.
- Cover the pan loosely with a kitchen towel or paper wrap and allow to rise for 40 to 50 minutes, or until puffy and doubled in size.
- Bake in a preheated 350 F oven for about 20 to 23 minutes, or until the crumbs are golden. Remove from oven and allow to slightly cool as the filling might be too hot.
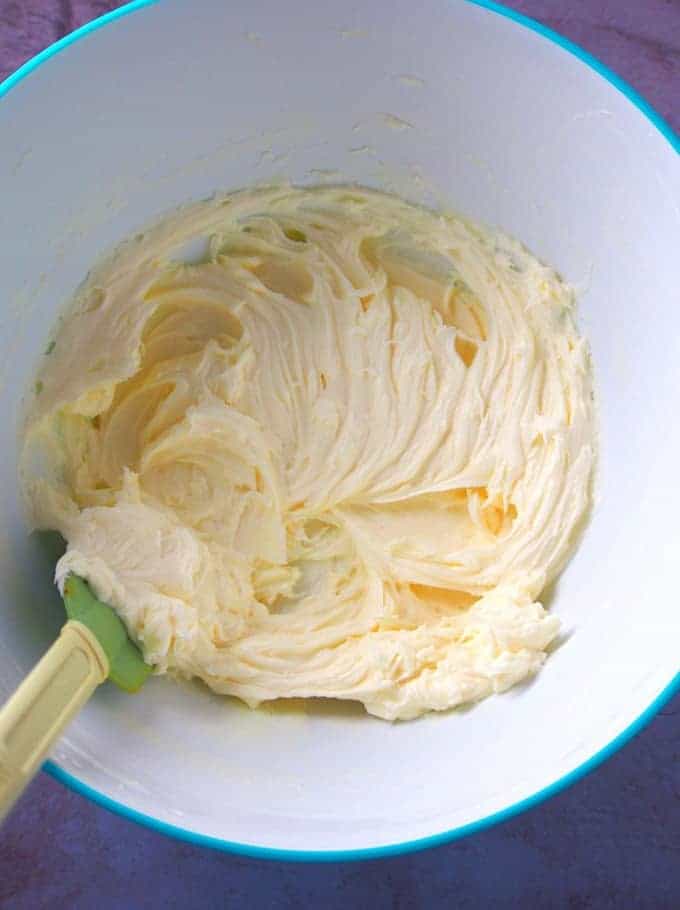
Cream cheese filling
The soft, fluffy bread rolls are a treat on their own, but the perfectly sweet and creamy filling takes them over the top!
- In a mixing bowl, briefly beat the cream cheese just until fluffy.
- Add the powdered sugar and vanilla and beat just until the mixture is lump-free. Do not overbeat so as not to soften the cream cheese too much.
- Cover and keep refrigerated until ready to use.
How to serve
- Red velvet pandesal are delicious for breakfast or at any time of the day snack. They're best enjoyed fresh from the oven, but practice caution as the filling can be scalding hot.
- Store leftovers in an airtight container to extend freshness. They'll keep at room temperature for up to 2 days or in the refrigerator for up to 2 weeks.
- To reheat in the oven, place the bread rolls in a baking dish and bake in a 350 F oven for 5 to 7 minutes until warm. To reheat in the microwave, arrange on a microwavable plate and cover with a slightly damp kitchen towel. Microwave for about 30 to 40 seconds or just until warm and not piping hot lest they turn tough and chewy.
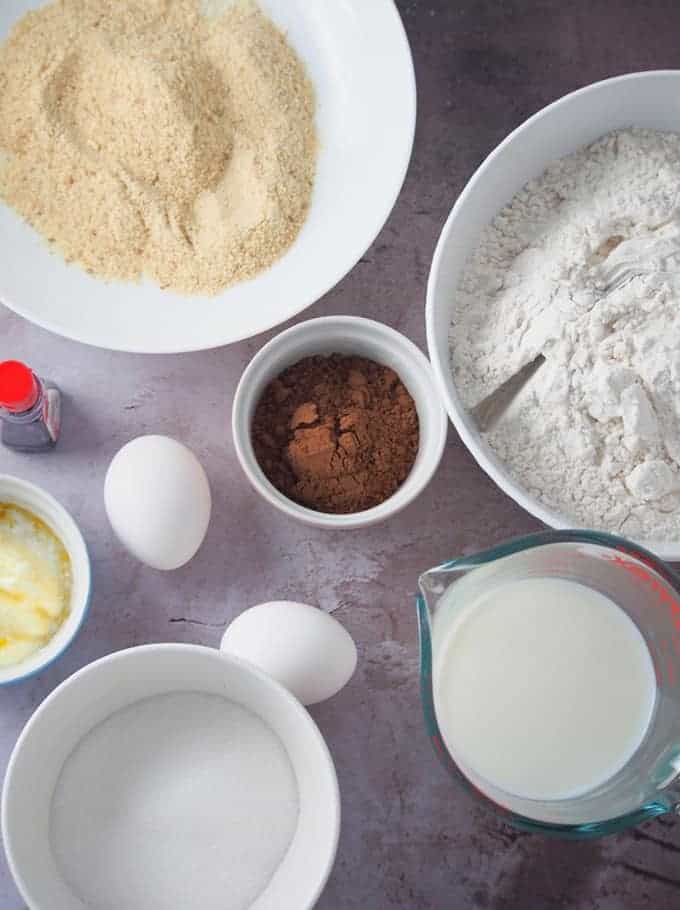
Ingredients
- ¼ cup warm water
- 1 package (2 ¼ teaspoons) active dry yeast
- 1 cup warm milk
- 2 ounces butter, softened
- 2 eggs, lightly beaten
- ¾ cup sugar
- 1 ½ teaspoons salt
- 3 tablespoons cocoa powder
- 1 ½ tablespoons liquid red food coloring
- 4 ¼ cups flour plus ¼ to ½ cup as needed
- 1 tablespoon canola oil, for kneading
- ½ cup fine bread crumbs
Cream Cheese Filling
- 1 block (8 ounces) cream cheese, softened
- ½ cup powdered sugar
- ½ teaspoon vanilla extract
Instructions
- In a stand mixer bowl, add the warm water. Sprinkle the yeast and about 1 teaspoon of the sugar. Let this sit for about 5 minutes, or until foamy.
- Add the milk, the remaining sugar, eggs, softened, butter, salt, cocoa powder, and red food coloring. Stir well.
- Add 2 cups of flour, and using a dough hook, beat the mixture until combined. Gradually add the remaining 2 ¼ cups of flour in ½ cup increments and continue beating to combine. If the dough is still too wet, add a few tablespoons of the reserved flour just until the dough gathers into a shaggy mass.
- Turn the dough over on a lightly-oiled surface and sprinkle dough with a little flour. Lightly grease hands and knead the dough the dough until smooth, elastic and has lost a lot of its stickiness.
- Place the dough in a lightly oiled bowl. Cover the bowl with a clean towel or plastic wrap and let rise for 1 /2 to 2 hours, or until doubled in size.
- Meanwhile, make the cream cheese filling. In a mixing bowl, briefly beat the cream cheese just until fluffy.
- Add the powdered sugar and vanilla and beat just until incorporated and lump-free. Cover and keep refrigerated until ready to use.
- Once risen, gently deflate the dough. On a flat surface, shape the dough into a log about 20-inch long. Divide the dough in half. Shape and elongate each half into 12 inches long. Divide each log into 12, yielding 24 equal dough portions.
- With the palm of hands, flatten each dough and spoon about ½ tablespoon of the filling in the center. Fold the edges of the dough towards the center to cover the filling, and shape into a smooth ball. Tuck the ends under to seal.
- Roll the dough ball in bread crumbs and arrange in a single layer at an inch apart on a parchment-lined baking sheet.
- Cover the pan loosely with a kitchen towel and allow to rise for 40 to 50 minutes, or until puffy and doubled in size.
- Bake in a preheated 350 F oven for 20 to 23 minutes, or until the crumbs are golden.
- Remove from oven and allow to slightly cool as the filling may be very hot.
Notes
- Check the temperature of the water used for proofing the yeast to ensure it’s within 105-115 F range as very hot liquids can kill the yeast.
- The dough will be sticky. To make kneading easier while keeping the bread texture soft, use oil and about 1 teaspoon flour. Grease work surface and your hands as needed but do so sparingly as oversaturating the dough with oil will keep it from rising and too much flour will make it dry.
- To check if the dough is well-kneaded, do the windowpane test. Take a small portion of the dough and with your fingers, stretch it out to form a square. A translucent film should form in the center without breaking easily.
Nutrition Information
“This website provides approximate nutrition information for convenience and as a courtesy only. Nutrition data is gathered primarily from the USDA Food Composition Database, whenever available, or otherwise other online calculators.”


Momzilla says
Hi! What kind of cocoa powder did you to he specific? I tried making this with 3tbsp of ghirardeli 100% cocoa powder and it came out somewhat bitter. Can i also use plain sugar instead of powdered sugar?
Diana says
Thanks for the recipe… like it
Lalaine Manalo says
You're welcome 🙂
Anne says
Hello, if using Instant Yeast, do you omit the water that is supposed to be used to proof the ADY?
Leonor says
I’m making my dough and have followed all directions and my dough is SO sticky. I’ve added additional flour and it’s just a mess. Is it possible I need more than the extra 1/2 cup?
Mia says
Hi! How much instant yeast can be used here?
Joan says
Can I prepare the dough ahead of time then baked it the next day?
Cath says
Whats the shelf life po? Or how do we store left overs?
Geri says
tried this recipe but without the food color (i didnt have any) and it was amazing my family loved it as well.