
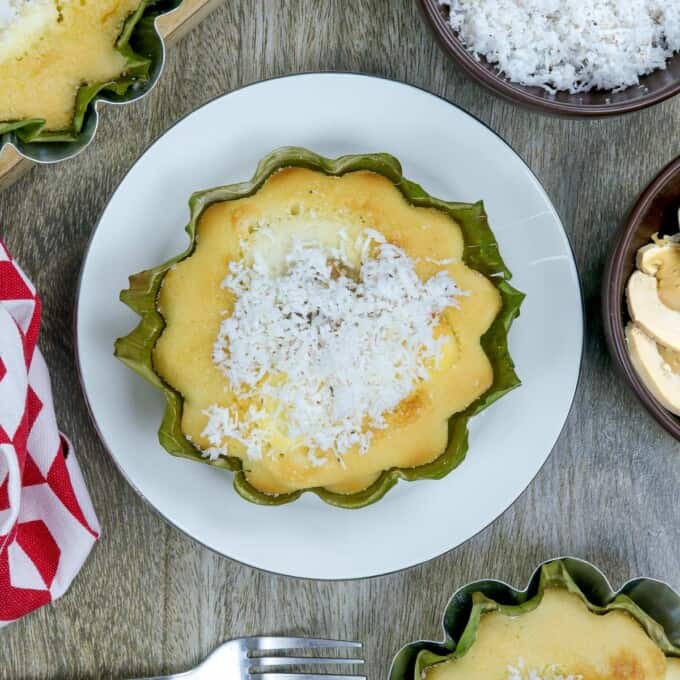
Delicious Bibingka you can easily make at home! Topped with salted eggs, cheese, and grated coconut, this classic Filipino rice cake is the ultimate Christmas treat!
Since the BER months are here and the holiday season has officially started, I thought I'd update my bibingka post with new photos and cooking tips. Nothing says Filipino Christmas better than this Filipino native cake, right? Except, maybe, the festive cathedral window gelatin or layered crema de fruta cake.
I spent part of this week testing various recipes and trying to develop a traditional version made from galapong. However, after going through enough rice grains to feed a nation in my experiments, I realized the easiest way to make bibingka at home is to use rice flour.
Forget soaking and grinding! Buy a bag of rice flour at the grocery store, and your favorite Filipino treat will be a matter of stirring the ingredients into a batter and quickly popping the mixture in the oven to bake!
What is Bibingka
Bibingka is a classic Filipino delicacy that's especially popular during Christmas. Sold outside churches during the nine-day Misa de Gallo, it's commonly enjoyed after the mass as breakfast or as a midday snack with a cup of hot chocolate or salabat.
Similar to putong bigas, traditional bibingka is made with galapong. Rice grains are soaked in water overnight to ferment and soften and then ground using stone mills into a thick paste.
The resulting rice dough is combined with water or coconut milk to form a batter and baked in a banana-lined terra cotta pot until set and nicely charred. These specialized clay pots function like an oven, using hot coals positioned on top and bottom as heat sources.
The Ilocos region has its version called Royal Bibingka. It's made with glutinous rice flour, coconut milk, eggs, and cheese, giving it a soft and chewy texture similar to mochi.
I
I
Ingredient notes
- The batter uses a mix of rice and glutinous rice flour for quick and easy preparation.
- You can add a drop or two of yellow food coloring to the batter to deepen the color.
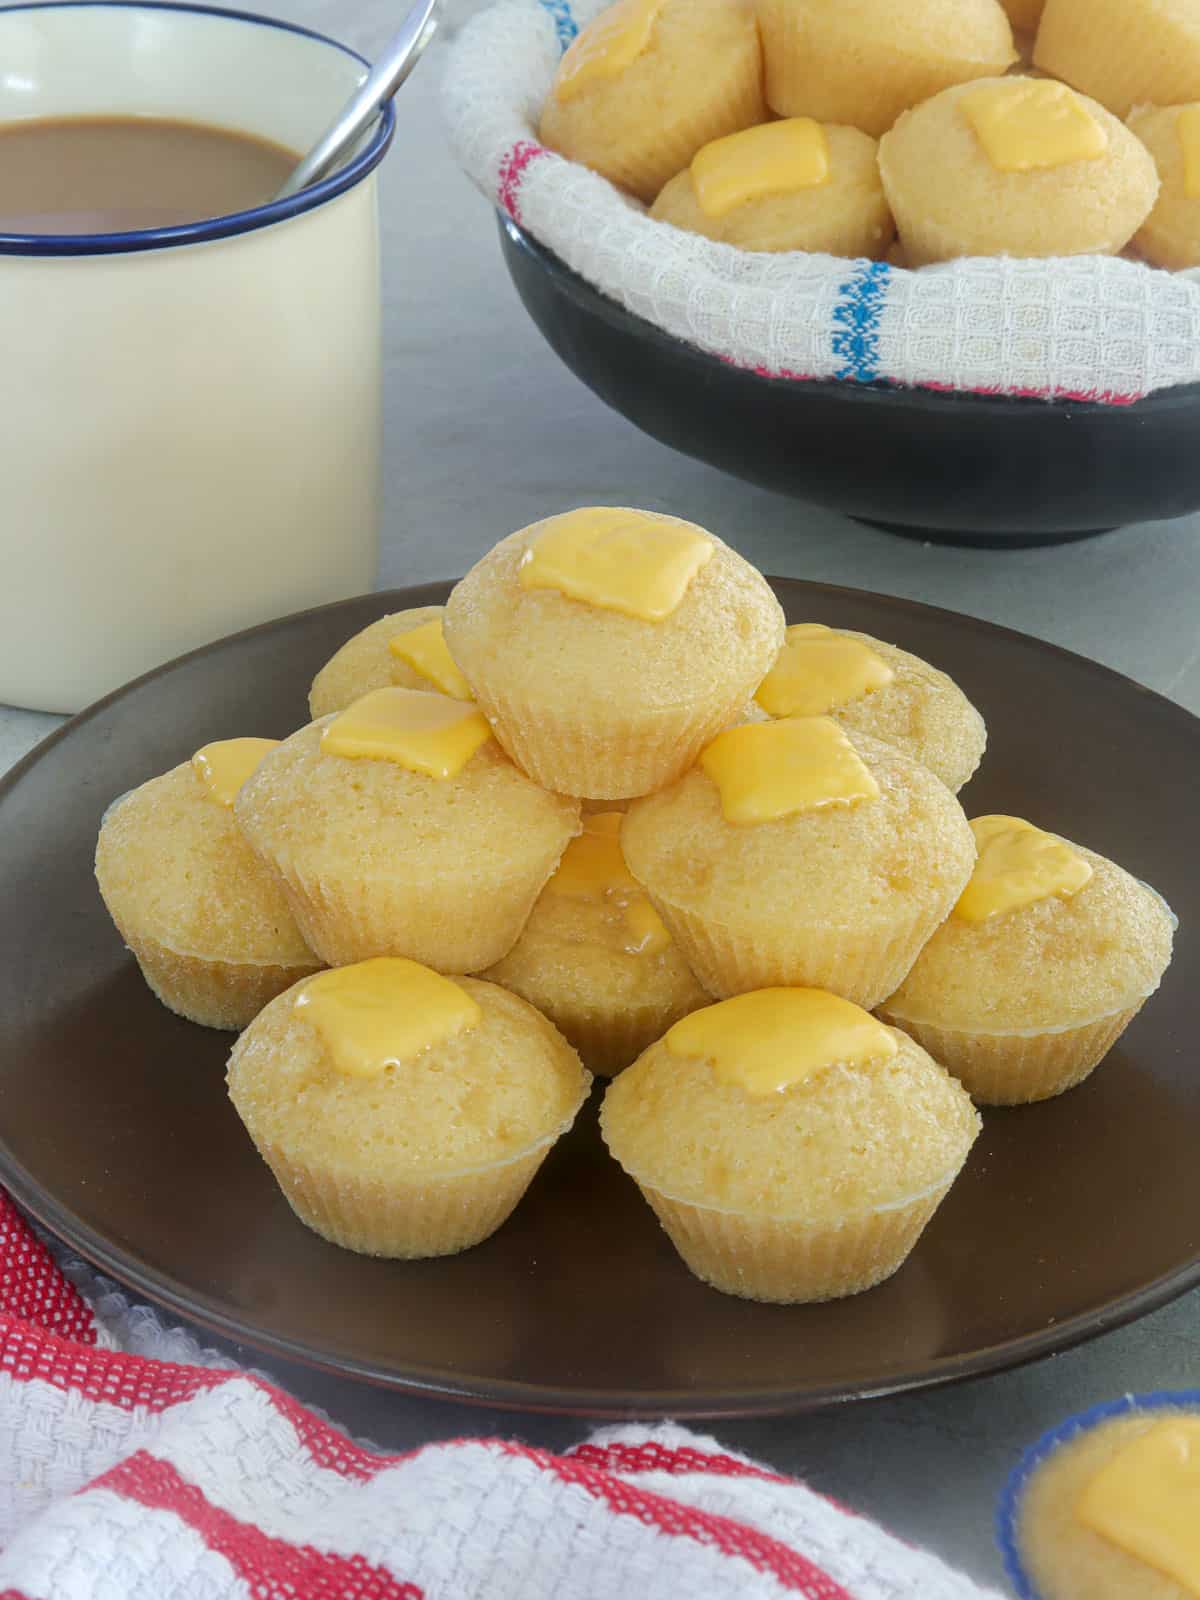
- The rice cakes, in their basic form, are a simple mixture of galapong and water, but we're making them extra special with coconut milk, beaten eggs, sliced salted duck eggs, and cheese.
- I like to add sliced cream cheese as a topping. You can substitute kesong puto, queso de bola, or sharp cheddar cheese.
Equipment needed
- Banana leaves keep the rice cake from sticking and add an incredible aroma. Inspect the leaves to ensure they're intact and free of rips, then pass them quickly over a gas flame until soft and pliable. You can line the tins with parchment paper if you can't find banana leaves.
- I use mamon tin molds I bought in the Philippines, but large muffin tins or fluted pie pans will also work.
Resting the batter

I came to this method by happenstance. I was retesting the recipe for the hundredth time last weekend, but since it was late in the night and I was too sleepy to finish baking the whole batter, I refrigerated the remainder with plans to bake it the next day. The batter thickened quite nicely overnight, and the resulting rice cakes were softer and fluffier!
I discovered that resting the batter improves baked goods. It allows the flour to hydrate and the starch grains to swell, giving the liquid time to soften the flour and the gluten to relax. A good rest also helps distribute the leavening agent evenly for a more tender crumb.
You can cook the bibingka immediately, but if you have time, I suggest letting the batter chill for the best results. Note that it gets thicker the longer it sits.
Helpful tip
To achieve the characteristic charring obtained from cooking in clay pots, broil the bibingka for about 1 to 2 minutes after it has set.
Serving suggestions
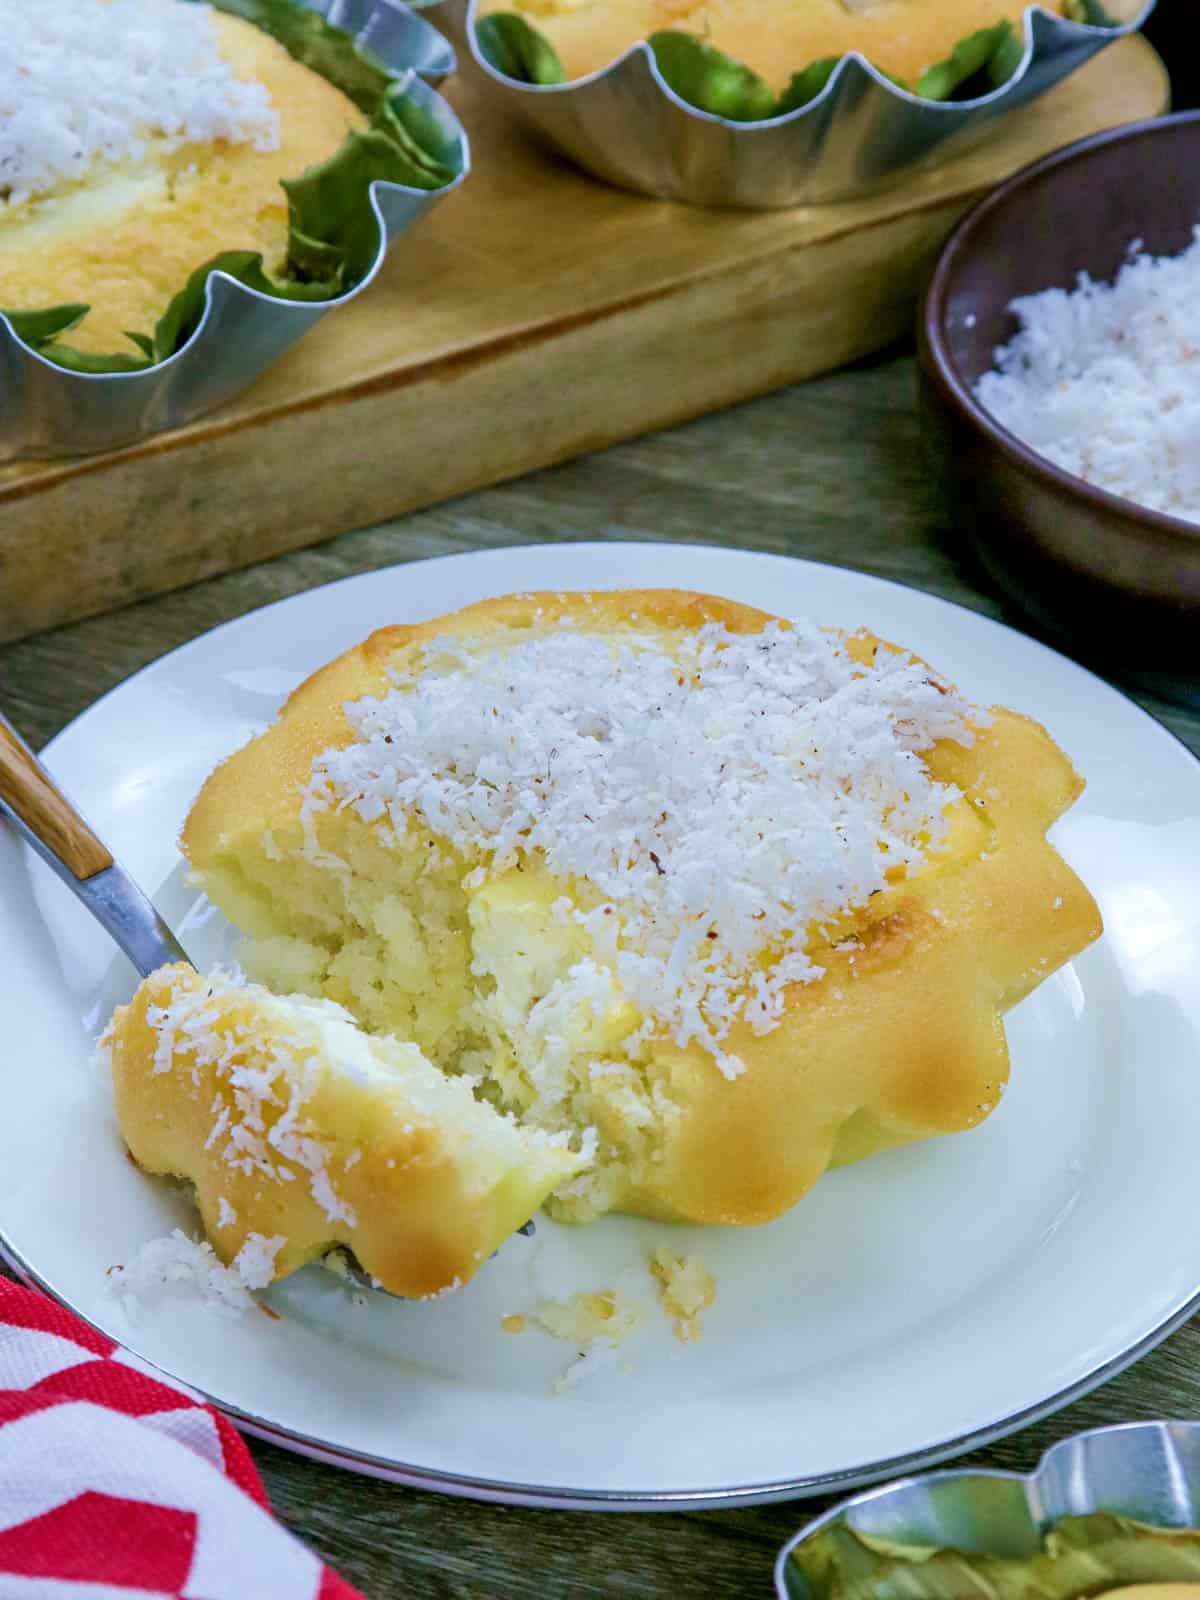
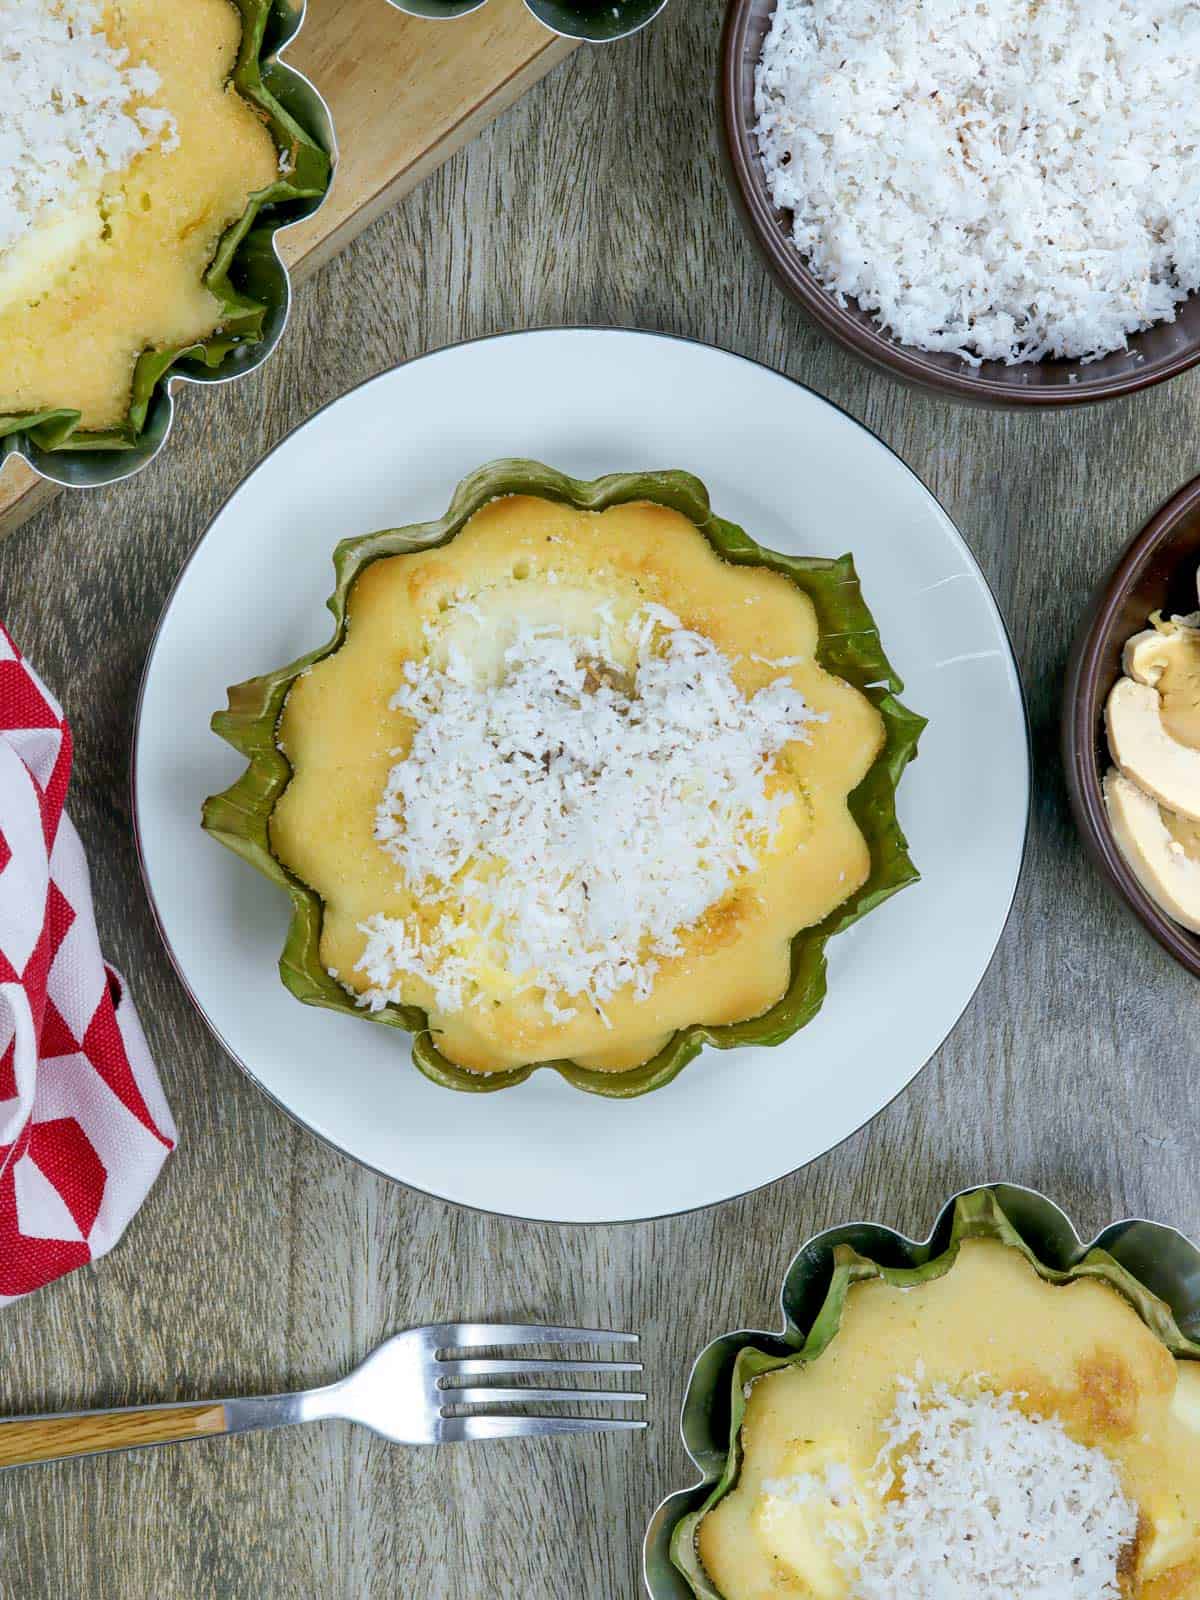
These Filipino rice cakes are usually eaten hot or warm, with margarine spread on top and a generous sprinkling of grated coconut. Enjoy them with a cup of tsokolate de batirol or salabat for a Christmas treat!
More snack recipes
Ingredients
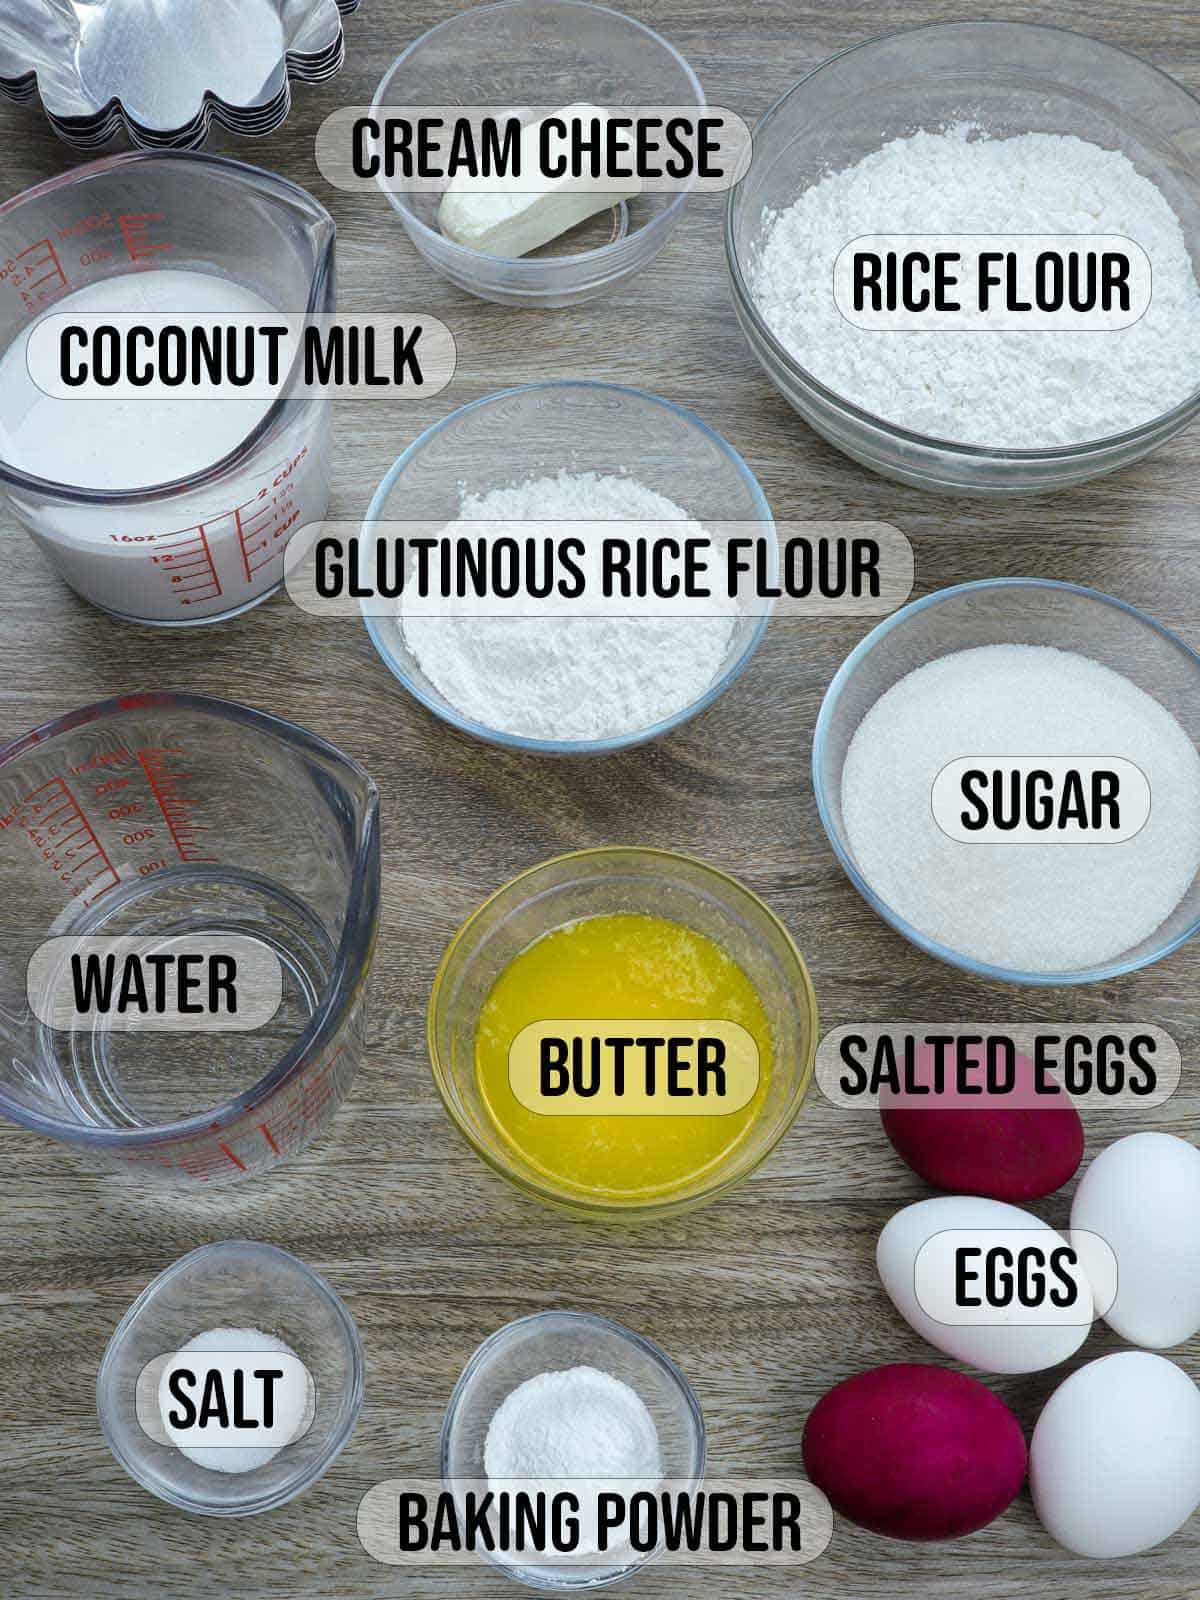
- 2 cups rice flour
- ½ cup glutinous rice flour
- 1 cup sugar
- 1 tablespoon baking powder
- 1 teaspoon salt
- 1 ½ cups coconut milk
- ½ cup water
- 3 eggs, beaten
- ¼ cup melted butter
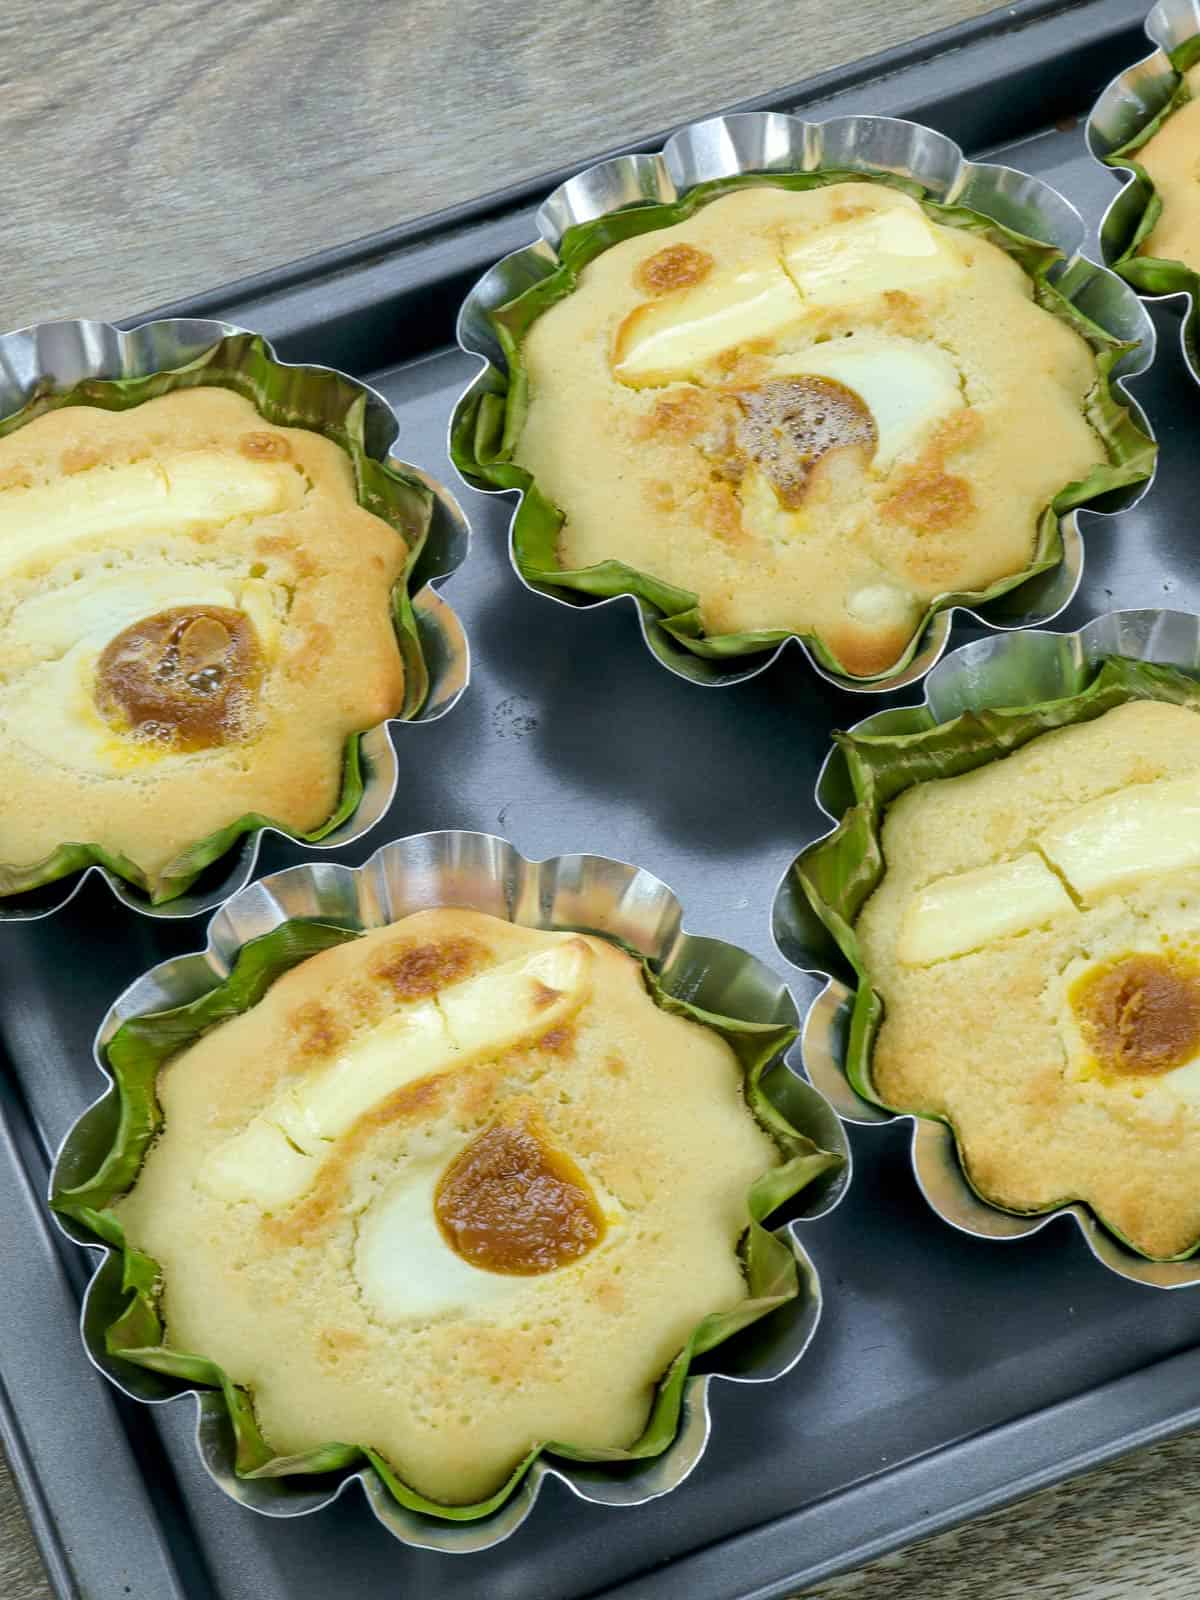
- 2 salted eggs, peeled and sliced lengthwise
- 2 ounces cream cheese, sliced thinly (you can substitute kesong puti or queso de bola)
For Toppings
- margarine or butter, softened
- Sugar to taste
- Grated mature coconut
Equipment
- mamon tin molds
Instructions
- In a large bowl, combine rice flour, glutinous rice flour, sugar, baking powder, and salt. Whisk until well-combined.
- Add coconut milk, water, butter, and eggs. Stir until smooth and well-blended.
- Cover the batter and refrigerate overnight.
- Rinse banana leaves under warm water and wipe off any dirt or grit. Using scissors, trim any thick edges and cut into circles large enough to cover bottom and sides of the pan.
- Quickly pass and heat banana leaves over stove flames for a few seconds or until just softened. Line the pans, making sure the leaves are intact with no rips.
- Pour the batter into the prepared pans up to ¾ full. Arrange sliced salted eggs and cream cheese slices on top.
- Arrange the filled tin molds in a single layer on a baking sheet and place in the oven on the lower rack. Bake in a 375 F oven for about 20 to 25 minutes or until a toothpick inserted in the middle comes out clean.
- Transfer the baking sheet to the top rack and continue to cook for about 3 to 5 minutes or until lightly golden.
- Remove from heat. Spread margarine or butter and sprinkle sugar on top. Garnish with grated coconut. Serve hot.
Notes
- Banana leaves keep the rice cake from sticking and also add an incredible aroma. Inspect the leaves to make sure they're intact and free of rips and pass them quickly over a gas flame until soft and pliable.
- If you can't find banana leaves, you can line the tins with parchment paper.
- I use mamon tin molds I bought in the Philippines, but large muffin tins or fluted pie pans will also work.
- To deepen the color, you can add a drop or two of yellow food coloring to the batter.
- I like to add sliced cream cheese as a topping. You can substitute kesong puto, queso de bola, or sharp cheddar cheese.
- To achieve the characteristic charring obtained from cooking in clay pots, broil the bibingka for about 1 to 2 minutes after it has set.
Video

Nutrition Information
“This website provides approximate nutrition information for convenience and as a courtesy only. Nutrition data is gathered primarily from the USDA Food Composition Database, whenever available, or otherwise other online calculators.”
Mervin Cruz says
Simple, easy and its good. I will have them as one of our side dish for Christmas.
Divina Aram says
I substitute mine with fresh milk instead of water. The result is really delicious. I love this recipe. More power to you!
Maita Diaz says
Hi, would just like to ask, if you rest the batter overnight, do you do so with or without the baking powder added in? Thanks!
Camille says
You're gonna have to look into the metric measurements of this recipe. There seems to be errors in the conversion such as the 200 g of baking powder.
Myanne says
Hi! I’m pretty sure I’ve made this recipe with yeast in it + resting it for a few hours, but I do not see that on the ingredients or instructions. I did see prior comments asking about yeast. How much yeast did you add in the original recipe? I really liked the result and the flavor it adds (tastes more traditional). Thank you!!
Chary says
,OMG!! 🥳🥳👏🏻👏🏻👍🏻. I got the bibingka consistency I want and it's making the batter from scratch!! Yummy!! So easy.
Lalaine Manalo says
I'm glad the recipe worked well for you 🙂
Elaine Rivera says
Tried it and turned out perfect consistency.
Thanks Lalaine
Vickie says
Can you freeze this bibingka recipe?
Riki says
Hello-
I would love to make this recipe, but prefer to go all the way and would like to know instructions for making my own galapong. My initial thoughts are to substitute 1 cup of dry rice for the 2 cups of rice flour, and instead of allowing the fermentation with yeast to take place over 2 to 3 hours, allow the mixture to sit overnight. The following day instead of grinding, would using a Ninja blender to blend be sufficient?
Very much so looking forward to trying this recipe! Thank you for your wonderful blog!
Best,
Riki
Renee says
I need simple recipe if bibingca
Ana Marie Merano Raymundo says
Bibingka is one of my favofite snack.
Che says
Hi po. Can I replace the rice flour to all-purpose flour? Is there any flour alternatives? Thank you so much.
Linda says
Where can I buy the hulmaan
paula ison says
Hi. Where is the old Recipe where you use baking powder instead dry yeast?
Phil Manabat says
I should have read this comment section before I baked the Bibingka. I used glutinous rice flour. The result dense sticky texture. I will try again with regular rice flour.